
Grid 화면의 Course 어플 만들어보기
연습: 그리드 빌드 | Android Developers
복잡한 레이아웃으로 그리드를 빌드하는 방법을 알아보세요.
developer.android.com
위의 페이지를 참고하여
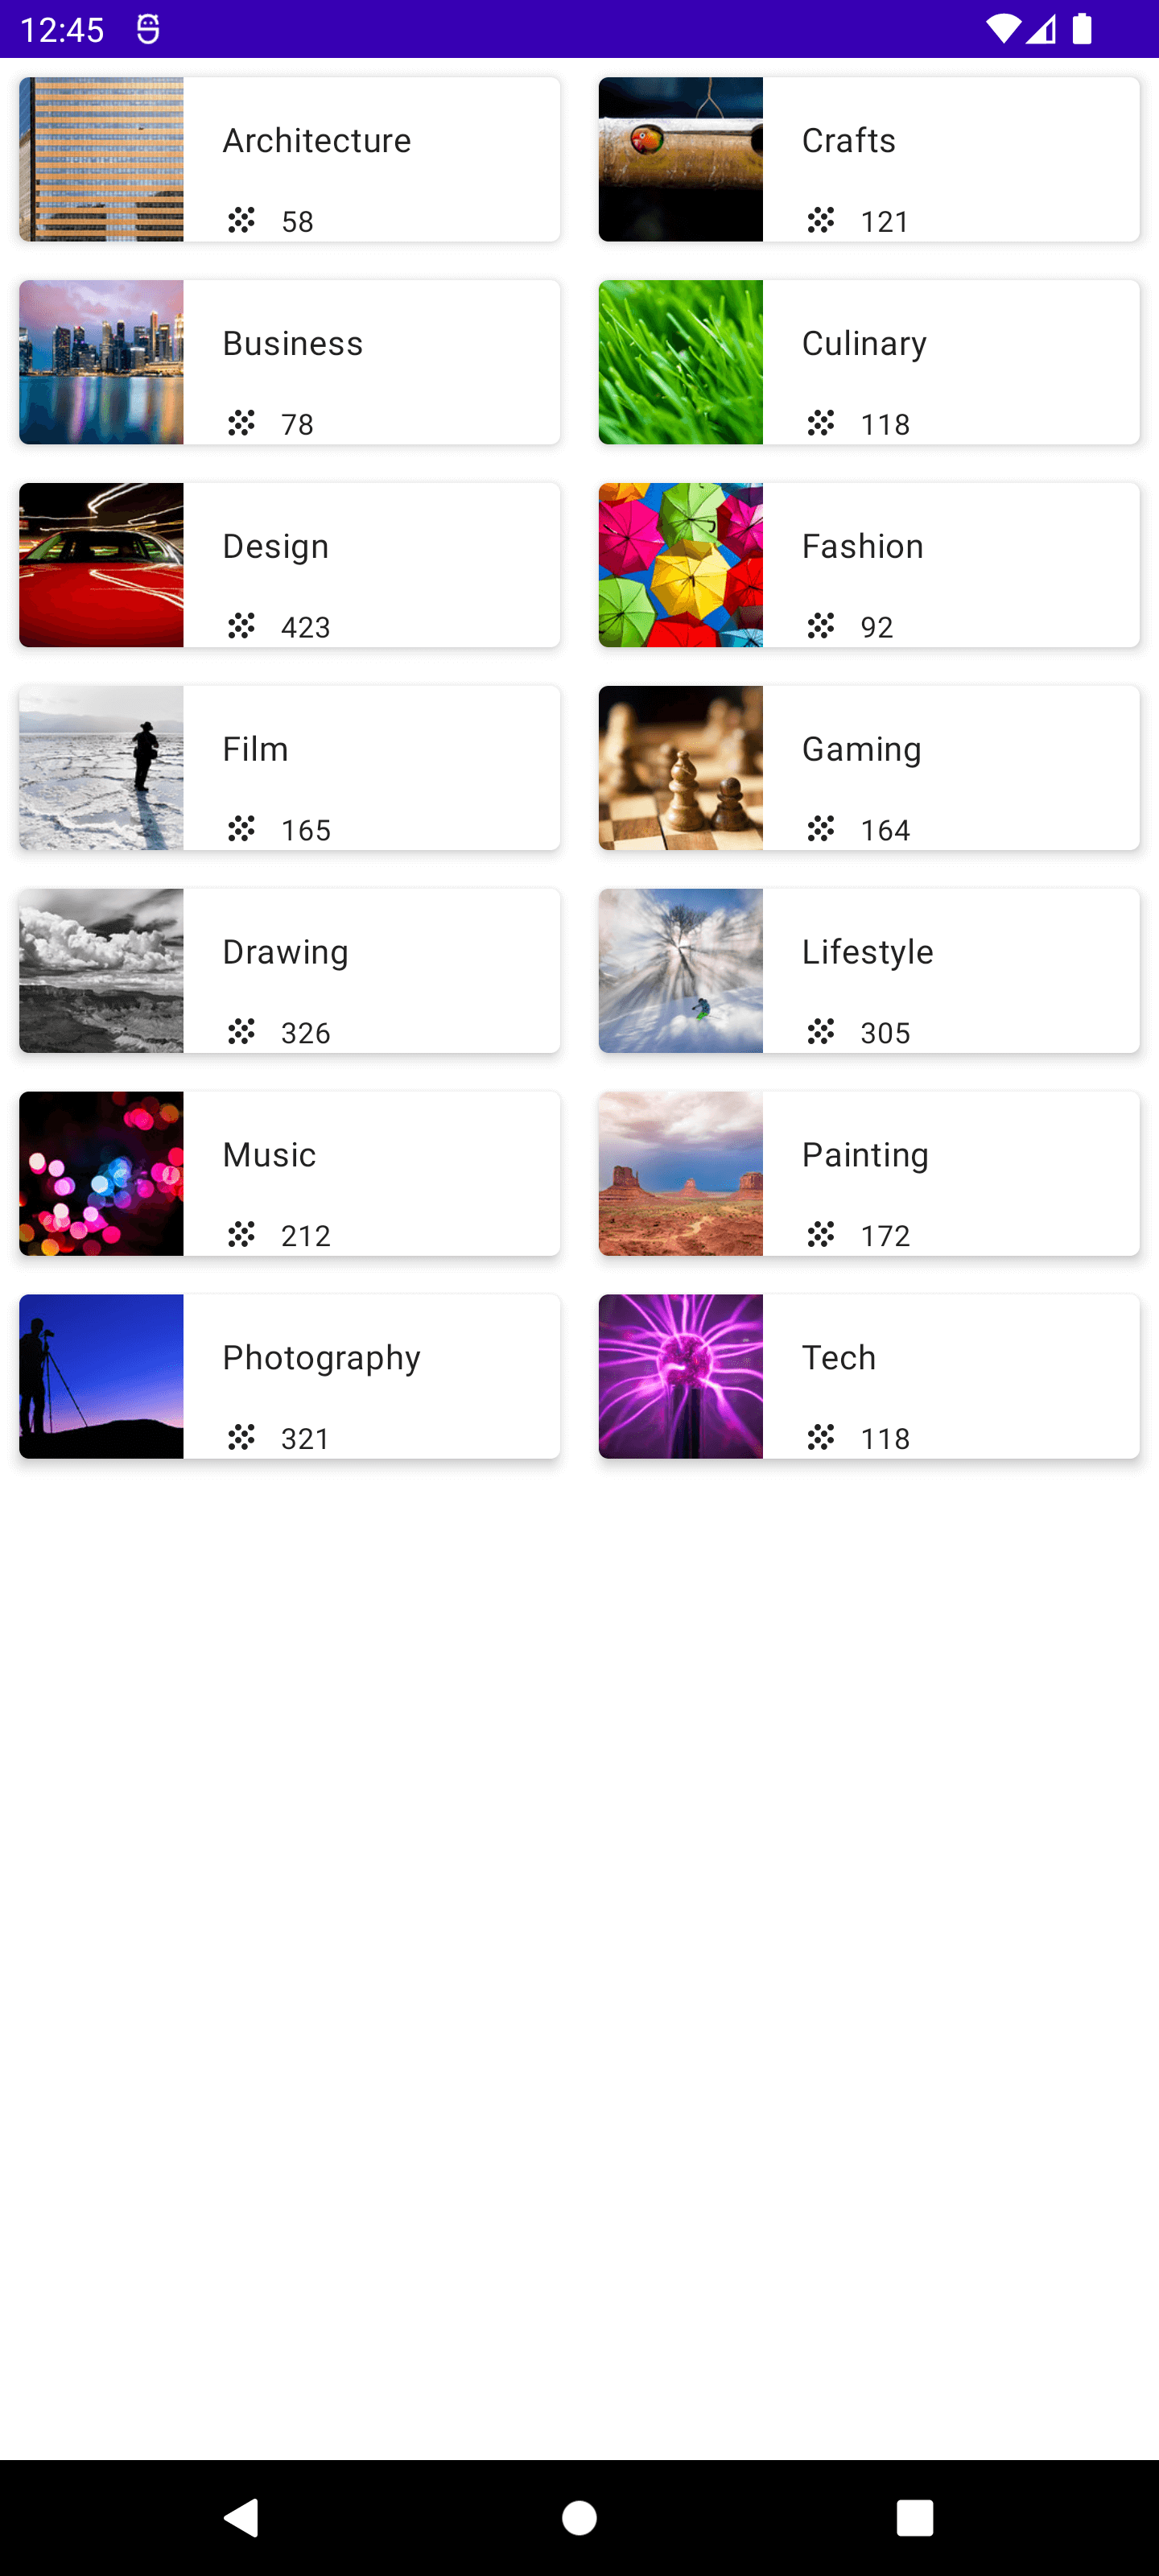
화면이 바둑판 같이 생긴 Course 어플을 만들어보자
개요
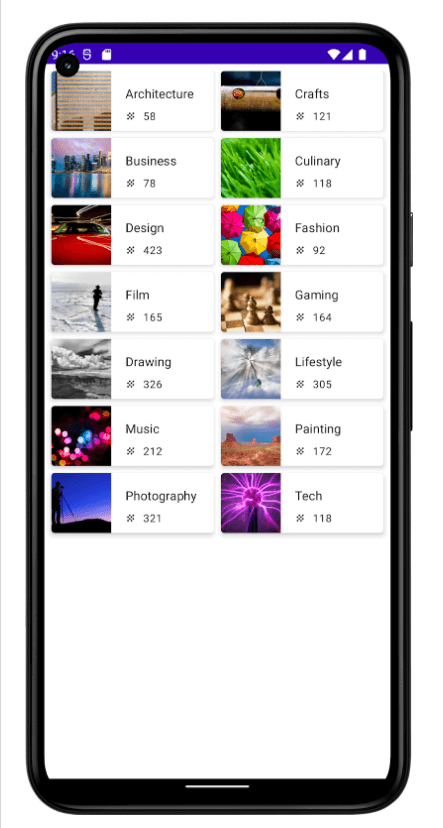
최종 앱 화면이 다음과 같은 앱을 만드는 연습을 해보자
주어지는 데이터는 다음과 같다
string.xml
<string name="architecture">Architecture</string>
<string name="crafts">Crafts</string>
<string name="business">Business</string>
<string name="culinary">Culinary</string>
<string name="design">Design</string>
<string name="fashion">Fashion</string>
<string name="film">Film</string>
<string name="gaming">Gaming</string>
<string name="drawing">Drawing</string>
<string name="lifestyle">Lifestyle</string>
<string name="music">Music</string>
<string name="painting">Painting</string>
<string name="photography">Photography</string>
<string name="tech">Tech</string>
DataSource.kt
object DataSource {
   val topics = listOf(
       Topic(R.string.architecture, 58, R.drawable.architecture),
       Topic(R.string.crafts, 121, R.drawable.crafts),
       Topic(R.string.business, 78, R.drawable.business),
       Topic(R.string.culinary, 118, R.drawable.culinary),
       Topic(R.string.design, 423, R.drawable.design),
       Topic(R.string.fashion, 92, R.drawable.fashion),
       Topic(R.string.film, 165, R.drawable.film),
       Topic(R.string.gaming, 164, R.drawable.gaming),
       Topic(R.string.drawing, 326, R.drawable.drawing),
       Topic(R.string.lifestyle, 305, R.drawable.lifestyle),
       Topic(R.string.music, 212, R.drawable.music),
       Topic(R.string.painting, 172, R.drawable.painting),
       Topic(R.string.photography, 321, R.drawable.photography),
       Topic(R.string.tech, 118, R.drawable.tech)
   )
}
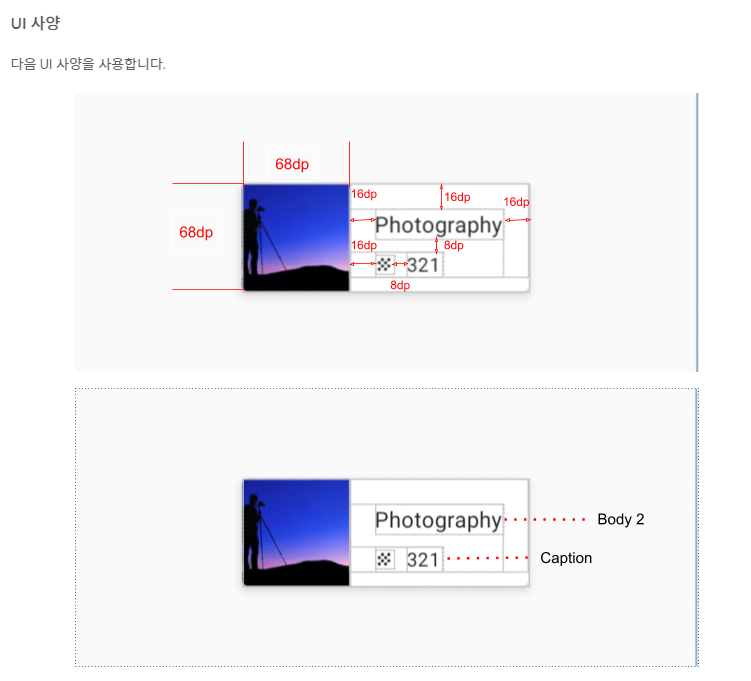
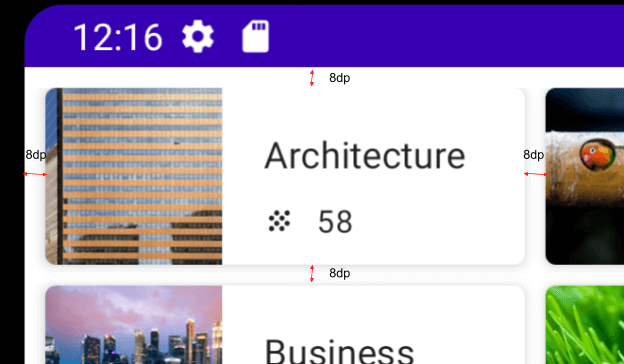
UI 사양은 다음과 같다
결과코드
Topic.kt
package com.example.course

import androidx.annotation.DrawableRes
import androidx.annotation.StringRes

data class Topic(@StringRes val  stringId: Int, val amount: Int, @DrawableRes val  drawbleId: Int)
MainActivity.kt
package com.example.course

import android.os.Bundle
import androidx.activity.ComponentActivity
import androidx.activity.compose.setContent
import androidx.compose.foundation.ExperimentalFoundationApi
import androidx.compose.foundation.Image
import androidx.compose.foundation.layout.*
import androidx.compose.foundation.lazy.GridCells
import androidx.compose.foundation.lazy.LazyVerticalGrid
import androidx.compose.foundation.lazy.items
import androidx.compose.material.*
import androidx.compose.runtime.Composable
import androidx.compose.ui.Modifier
import androidx.compose.ui.res.painterResource
import androidx.compose.ui.res.stringResource
import androidx.compose.ui.tooling.preview.Preview
import androidx.compose.ui.unit.dp
import com.example.course.ui.theme.CourseTheme

class MainActivity : ComponentActivity() {
    override fun onCreate(savedInstanceState: Bundle?) {
        super.onCreate(savedInstanceState)
        setContent {
            CourseTheme {
                // A surface container using the 'background' color from the theme
                Surface(
                    modifier = Modifier.fillMaxSize(),
                    color = MaterialTheme.colors.background
                ) {
                    CourceApp(DataSource.topics)
                }
            }
        }
    }
}

@Composable
fun CourceApp(topicList : List<Topic>) {
    CourseColumn(topicList)
}

@OptIn(ExperimentalFoundationApi::class)
@Composable
fun CourseColumn(topicList : List<Topic>){
    LazyVerticalGrid(cells = GridCells.Fixed(2)){
        items(topicList) { topic ->
            CourseCard(topic)
        }
    }
}

@Composable
fun CourseCard(topic: Topic){
    Card(elevation = 4.dp, modifier = Modifier.padding(8.dp)){
        Row(){
            Image(
                painterResource(topic.drawbleId),
                contentDescription = null,
                modifier = Modifier
                    .width(68.dp)
                    .height(68.dp)
            )
            Column(){
                Text(
                    stringResource(topic.stringId),
                    style = MaterialTheme.typography.body2,
                    modifier = Modifier.padding(
                        start = 16.dp,
                        top = 16.dp,
                        end = 16.dp,
                        bottom = 8.dp
                    )
                )
                Row(){
                    Icon(painter = painterResource(R.drawable.ic_grain), contentDescription = null,
                        modifier = Modifier
                            .width(40.dp)
                            .height(16.dp)
                            .padding(
                                start = 16.dp,
                                end = 8.dp
                            )
                    )
                    Text(topic.amount.toString(), style = MaterialTheme.typography.caption)
                }
            }
        }

    }
}

@Preview(showBackground = true)
@Composable
fun DefaultPreview() {
    CourseTheme {
        CourseCard(Topic(R.string.architecture, 10, R.drawable.architecture))
    }
}
전체적인 코드의 구조가 이전에 만들었던 동기부여 앱 코드와 상당히 흡사하다
그러니
1. LazyVerticalGrid와 Optin
2. Icon
이 두가지의 문법적 포인트만 확인하자
LazyVerticalGrid와 Optin
lazy는 무슨 의미인지 동기부여앱에서 확인했었다
다시 정리하자면 lazy는
화면에 보이는 composable만 렌더링해서
낭비되는 자원을 줄이는 역할을 해준다
vertical은 수직이고 grid는 바둑판식의 배열이니
대충 수직으로 나열하는 그리드구나 라고 생각하면 되겠다
LazyHorizontalGrid도 있다
아마도 나열되는 방향이 다른 듯 하다
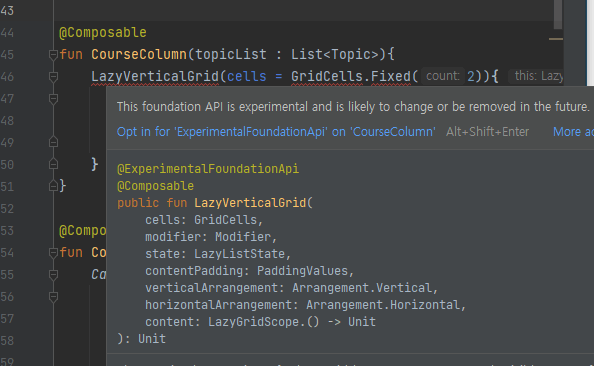
문제는 이 녀석을 쓰려고 하면
AndroidStudio에서 이렇게 오류를 띄운다
뭐.. 실험용이라 그렇다고 하는데
그렇다고 해서 다른 composable을 쓸 수가 없는게
이걸 대체할 녀석을 검색해도 찾지 못했다
그래서 그냥 이 자식을 쓰기 위해서 해야하는 것이
@OptIn(ExperimentalFoundationApi::class)이런 녀석을 추가해주는 것이다
이 @OptIn이라는 친구는 대충 읽어보면 알겠지만
쓰고자하는 API를 추가해주는 녀석이다
더블콜론은 뭐냐고 묻는다면
리플렉션..이라는 것인데
약간 오래전 기억 속에 묻혀있던 '동적 바인딩'과 비슷한 개념인 것 같다
솔직히 정확히 이해는 못함
아무튼 ::class는 더블콜론 앞에 있는 친구의 클래스를 '리플렉션'하는 거라고 생각하면 된다고 한다
간단하게 정리를 하자면
optin으로 ExperimentalFoundationApi의 클래스를 추가해서
LazyVerticalGrid를 쓰면 된다는 것이다
LazyVerticalGrid는 사용방법이 간단하다
(공식문서와 위의 오류 사진에서의 첫번째 인자 이름이 columns랑 cells로 다르다)
cells에 GridCells만 넣어주면 된다
This class describes the count and the sizes of columns in vertical grids, or rows in horizontal grids.
라고 한다.
그러니까 LazyVerticalGrid는 그냥 몇줄로 만들건지만 정하면 끝이다
위의 코드에서는 GridCells.Fixed로 변동 없이 딱 2줄로 정해줬다
그리고 동기부여앱에서 봤듯이 items를 통해 리스트의 항목을 나열한다
Icon
얘는 그냥 Image랑 똑같이 쓴다
왜 이름이 다르게 하나 더 있는 지는 잘 모르겠는데
의미를 구분하기 위해서일까?
아무튼 짚어볼 포인트는 이게 끝!
결과화면
'기타 > 안드로이드' 카테고리의 다른 글
| 28. Woof App : 애니메이션, icon 추가 (2) | 2022.10.29 |
|---|---|
| 27. Woof App : Material Design (0) | 2022.10.29 |
| Android Studio에서 emulator 녹화하는 방법 (2) | 2022.10.15 |
| 25. 앱 아이콘 바꾸기 (0) | 2022.10.14 |
| 24. Affirmation App : Scroll 기능 (0) | 2022.10.14 |


